Monday, 23 September 2013

French stick / French baguette

One of the most missed French food item, not to say THE most missed, is surely the bread, in particular the baguette, or French stick as you may better know it. It suits anything like cheese, meat, sauces, delifood, chocolate, butter of course!, jam or just straight from the oven!
The crust is golden and crispy, the breadcrumb is fluffy and moist... huuuummm (French version of Yuuuuuumm)...


Making French baguette/stick is really easy, but you need to know the rules. Yes it's just a matter of following all the gestures and manipulations explained in the recipe and some very basic knowledge about bread making. I hope that after this post, you'll feel confident that you can go ahead with making French baguette. I'm giving you all the tips I know to make a good baguette. Do not compromise and follow them carefully. Bread making is almost scientific, so if you follow the recipe, there is no way you can't mess it up! Success guaranteed at first go! (or reimbursed? LOL)


I used my Kenwood FP980 with the dough tool, but I used to make my baguette by hand before, so don't be afraid if you don't have a fancy kitchen aid.


Sunday, 22 September 2013

Honey and grainy mustard-glazed chicken thighs with orrechiette salad

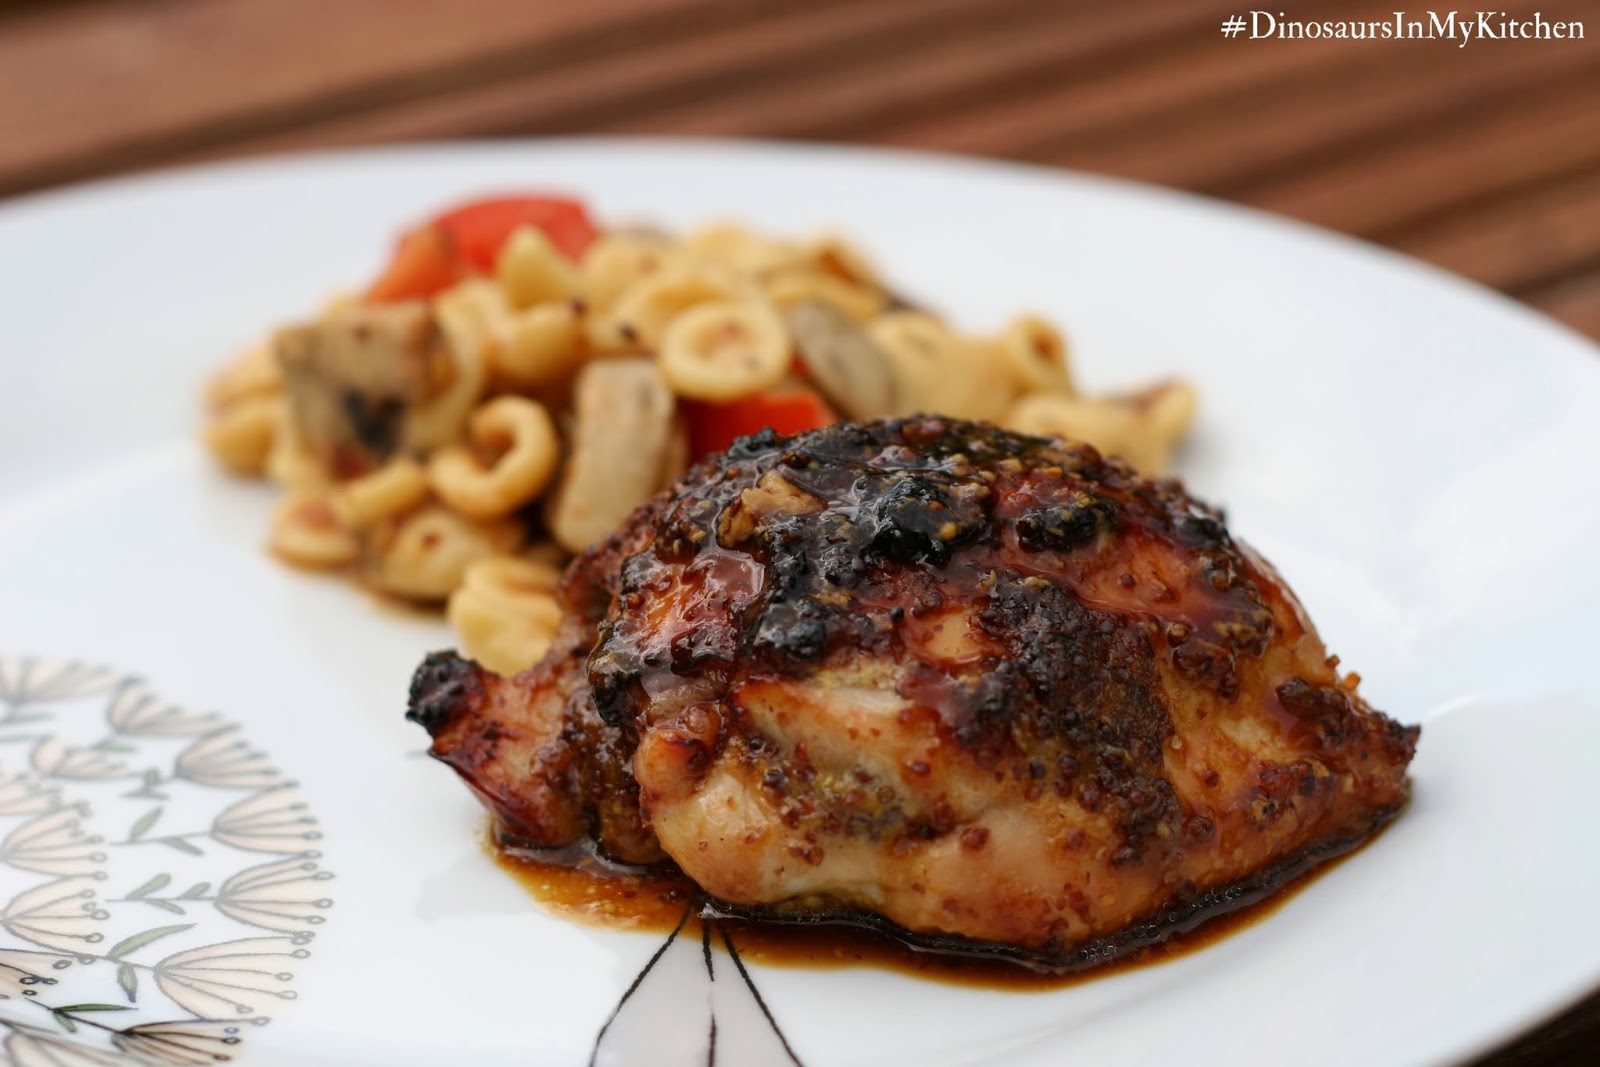
Sometimes, the best recipes are the improvised recipes. I recently received Rata honey for experimenting with it and grainy mustard from a friend. I thus improvised honey and grainy mustard-glazed chicken.


To serve with I used leftovers of home-made pasta dought, which I shaped into orrechiette to create a beautiful but simple roasted tomatoes and mushroom orrechiette salad. The salad is better served warm.


Spot on! all the flavours, from the chicken and the salad went very well together.


Home-made orrechiette are quite time-consuming - so we worked as a team: Dinodad rolled the little balls, Dinomum squeezed and rolled the balls on the board to form the orrechiette and Dino No.1 checked that the orrechiette were well shaped, while No. 2 was nicely sleeping! Heaven! These moments are so rare that I have to record them. But this is not the topic of this post!
Be reassured, you don't need to make your own orrechiette, dry orrechiette will be perfect instead!


Ingredients (6 servings)

- 6 chicken thighs, skinless, deboned
- 1 1/2 tbsp honey*
- 3 tbsp grainy mustard
- 1 tbsp olive oil
- salt, black pepper
- 4 tomatoes, chopped in 16
- 10 mushrooms, chopped in 4 or 6 depending their size
- mixed herbs
- 400 g orrechiette*

Instructions (~ 45 mins)

1. Pre-heat the oven, fan bake, at 180C.
2. Mix the grainy mustard, the honey and the olive oil together.
3. Brush the mustard mix all over the chicken tights and roll it on itself. Salt.
4. Put the meat in a baking dish and in the oven for 30 mins at 180C.*
5. Cook the orrechiette and prepare the veggies.
6. Five minutes before the chicken is ready, add half of the tomatoes and the mushrooms in the baking dish and cook with the chicken for 5 minutes. Keep the other half of tomatoes raw for the salad.
7. Take the veggies out and mix in the orrechiette (cooked and drained). Drizzle the cooking jus from the baking dish over the orrechiette as a seasoning. Add one extra tsp of mustard if you want to give it a kick.
8. Add the raw tomatoes and sprinkle some mixed herbs. Season with salt and pepper to your taste.
9. Serve and bon appétit!

Good to know...

* I used a Rata honey (Airborne); because it is a little buttery, I heated it slightly for better combination with the mustard and the oil.
* You're welcome to increase the portion of pasta, but after several months of WW diet (and 14 kg less! Yay!!!), I learnt to increase the proportions of veggies at the expense of the carbs. So if you want to keep this meal as healthy and balanced as possible, I suggest you stick with 60-70 g pasta per person.
* The honey, mustard and oil mix will slightly caramelised over the chicken. The pictures may look like burnt but it was just perfectly caramelised. That said, be careful that you oven temperature is not too high or the glazing may burn.
* For my GF friends, I suggest to replace the orrechiette by cannellini beans - you'll love this salad!

Wednesday, 18 September 2013

Mediterranean beef casserole

I love slow-cooking recipes! They are hearty, but can be made healthy, for quite cheap and require little skills. On the downside, it takes time to nurture such a dish. When I'm cooking for my family, it's always worth the time! And they give it back to me.
This Mediterranean beef casserole is perfect to warm up grey-ish days like today: a tiny tomato-ish, with spring seasoning based on thyme, balsamic vinegar, olives, capers and parsley, and a touch of red wine.


Served on mashed potatoes or pasta, all the family loves this hearty meal! Grown ups: Don't forget to compliment it with a glass of red wine ;)

Ingredients (~ 6 servings)

- 1 kg beef chuck strips (1 x 3 cm)
- 1 yellow capsicum
- 2 cups beef stock
- 1 cup red wine
- 1 onion, sliced
- 3 garlic cloves, crushed
- 1 tbsp olive oil
- 2 tbsp balsamic vinegar
- 2 tbsp tomato paste
- 2 tbsp capers
- 1/2 olives (green or black)
- 1 tbsp rosemary, chopped
- 2 tbsp fresh parsley, chopped
- salt, pepper


Tuesday, 17 September 2013

Soyu-marinated Snapper on the barbecue - From French Polynesia

Dressed in my supermom cape and tights, I took my two boys for shopping at the supermarket on Sunday morning, because daddy was out of service (cause another bug - poor him!).
When shopping with kids, you better be strategic. It's all about strategy to keep your kids quiet and well-behaved while not accessing every new query they make and being effective - meaning you've got what it takes to run the house for the whole week instead of chocolate and other treats for TV snacking.

Sunday it was quite easy, for once! After only few minutes in the supermarket and at least 10 requests from No. 1 - at this stage, No.2 is quite easy! -, we passed through the fish... and believe what! No.1 made another claim:
'Maman, I want a Snapper!... This one with the eyes!... Are there any bones in Maman?! ... I can't see the bones... Can I eat the skin? like for the chichen, mum?...'
Just wait a little bit more until he is developing a real tantrum for a Snapper:
'... Mamam, Maman, Maman!!!!'
Then keep calm and explain clearly to your little beloved one:
'Alright honey. That's okay for the Snapper. I'm taking one, honey. Just for you. Now, you've got to be very nice and well-behaved until I'm finished shopping. You've got a favour.' Don't smile too obviously or he/she might get suspicious about your intentions...
That's how I managed to get a perfect little boy and fish for lunch! YAY!!! My lucky day!


Together we 'painted' the snapper with a traditional Polynesian sauce: the soyu. By 'painted' understand 'brushed'. The soyu gives a tang to the delicate snapper flesh, but be light on the soyu because you don't want to over-season the fish. Serve it with steamed rice, grated carrot and raw cabbage, with a bit more soyu. This dish, coming straight from French Polynesia (i.e., Tahiti, Bora Bora, Moorea...), is perfect for a barbecue lunch/dinner with friends! Thanks to my very good friend from Tahiti who taught me this recipe few years ago - it has become part of our family food culture!


At table, looking at the whole fish with fascination, my son asked: 'Maman, can I have the eyes?'
Me: 'Emh... No. Honey, I really appreciate your interest for all sorts of food, but the fish eyes... no.'


Ingredients (~ 4-5 servings)

- 1k400 whole snapper
- soyu - see ingredients below
- fresh parsley (optional)

Sunday, 15 September 2013

Goat cheese, bacon and Rata honey tartines with dried figues

You'll love this classic French and simple dinner. You just need some bread, bacon, and goat cheese. Any real French has goat cheese in his fridge! Then to make those goat cheese tartines look and taste more fancy, just add a little bit of honey - I used Rata Honey kindly offered by Airborne for me to experiment NZ honey -, thyme and dried figues. Serve with green salad with Rata honey dressing and don't forget a glass of Pinot Gris or Chardonnay.

Airborne Rata Honey suited these tartines to perfection: creamy, buttery and slightly salty, it brought a nice balance to the saltiness of the bacon and to the tang of the goat cheese. This honey revealed its whole potential in the dressing while it brings sweetness and softeness in to the sharpness of the mustard and vinegar mix. Nice!


Quick, easy and a touch of fancy - ideal for busy moms and for busy host!

In France, we often prepare such tartines for quick dinners or as a gourmet entry when hosting friends. One may like replacing the goat cheese with blue cheese or cream cheese and sprinkle with some nuts, but my preference goes to the goat cheese.

There are not limits to your creativity to make gourmet tartines! What would be your favourite topping?


Ingredients (3 servings - 2 tartines/serve)

- 6 thick slices of bread*
- 125 g of soft goat cheese (more or less to meet your greediness!)
- 3 slices of bacon, stripped
- 2 tbsp of honey, slightly heated (15-20 secs in the microwave)
- thyme
- 6 dried figues

Dressing:
- 1 tsp French mustard (generous)
- 1 tsp sunflower oil
- 1 tsp red wine vinegar
- 2 tsp white wine vinegar
- 1 tsp Rata honey
- 2 tsp warm water

Preparation (~ 20 mins)

1. Pre-heat the over, grill function, at 210C.
2. Toast the bread under the grill until slightly coloured - takes approx. 4 mins each side.
3. Take the bread out of the oven and crumble the cheese over and sprinkle the bacon strips. Drizzle the heated honey and sprinkle fresh thyme over the cheese..
4. Bake under the grill for 6-7 mins - but check the colouration.
5. Prepare the dressing: brisk together the mustard and the oil until smooth and well combined. Then gradually mix in the vinegar, the honey and the water. It's ready!
6. Serve the tartines on the top of greens and drizzle a little bit more honey.
7. Don't forget the figues! I forgot them on the pictures, but they definitively add a plus to the dish

Bon appétit!


Good to know...

* Here I used home-made cereal bread, but any rustic-ish bread would suit.

Saturday, 14 September 2013

My NZ version of Paella: A seafood and meat one-pot dish

Seafood or meat? carbs or veggies? Why not all together in a gorgeous one-pot dish?
Today I'm sharing a rich nevertheless healthy Spanish-inspired one-pot casserole: A Paella.


Originally from the province of Valencia in Spain, there is not one version of the Paella, but many local or family versions. Here is my NZ quick - well relatively quick - and easy recipe!
Paella is a mix of white rice, green vegetables, meat (including rabbit, chicken and other) and/or seafood, beans, saffron-based seasoning and olive oil. This dish is originally cooked in a pan (not a pot as above) but you need a very large pan, so my version uses a pot (iron-cast). This cooking ustensil inspired the name of the Paella after the old French word for pan: paelle.

You'd be surprised how well this dish matches NZ food. It is actually a great dish to showcase the delicious - although a bit too big for my taste - green mussels from Coromandel and NZ shellfish like cockles freshly picked from Cockle Bay, Whangaparaoa - a great kid activity by the way! we love it!


Don't worry about the quantity of ingredients, it is still very easy to make. You can also adapt the recipe to your fridge and pantry, but my favourite version this mixed seafood and chichen Paella. Although today I had no prawns which also go very well in this dish.


Ingredients (6 servings)

- 750g cockles
- 24 green mussels
- 6 chicken drumsticks
- 1 whole squid, sliced*
- 1 whole hot chorizo, sliced*
- 2 tomatoes, peeled* and diced
- 250g green beans*
- 1 cup frozen peas
- 1 large red (or green) capsicum
- 1 onion, chopped
- 10g butter
- 1 sprig of parsley
- 1 shallot
- 1/2 cup white wine (Pinot gris)
- 1 cup of water
- 1 1/2 cup of parboiled rice
- 1 1/2 cup chicken stock*
- 1 1/2 cup seafood stock (included in this recipe)
- 1 dose of saffron*
- salt, pepper

Cooking instructions 

(~ 1.5 hour)

The preparation

First prepare all your ingredients: slice the chorizo, the squid and the capsicum; chop the onion and the shallot; peel and dice the tomatoes; cut the green beans' tails.

Thursday, 12 September 2013

Lemon confits / Preserved lemons

Thanks to my FB follower who spotted a inconsistency between my FB page and the blog! I had accidentally removed this post from the blog... I probably got distracted by something... or someone... wonder who this might be... Anyway lemon confits are back!

The winter has ended; it is a good time to finish harvesting the lemons (or to buy them at a fair price), but you don't know what to do with all these lemons!? Let's prepare some jars of lemon confits or preserved lemons for summer salads and tajines. This is a very simple preparation that will add the little plus to your, sweet and savoury dishes, cakes and cookies...


Ingredients

- 1 kg lemons (~ 8 lemons), preferably organic if not coming straight from your garden
- 200 g salt
- hot water
- 1 big jar


Instructions

1. Incise the lemons in four quarters - do not cut them, the quaters must keep together (see picture above).
2. Stuff with one tablespoon of salt.
3. Squeeze all the salted lemons in a steril jar.*
4. Add the remaining salt in the jar and cover with hot water.
5. Close the jar tightly and store for at least 3 weeks before use.


Tips

* To sterilise the jar, first clean it, then keep it in boiling water for 10-15 minutes.

Wednesday, 11 September 2013

Suspicious silence

Silence... that's a word I forgot the meaning. My life is quite noisy. But it's actually quite good to keep track of your kids' activities, otherwise...


What you can see on this picture is the genuine writing of a silent 4 years-old of mine... I should have known that this beautiful silence in my kitchen was suspicious... Never ever trust a silent child or you may have bad surprises! I am grateful to the genius creator of washable markers!

I know I've been quite silent myself lately, but don't you worry. I'm still very motivated to keep this blog live. I have plenty of recipes to share with you. I'll be back soon...

Cheers
Liz

Monday, 26 August 2013

Lamb confit in olive oil and lime jus - Delightful!

The dinosaurs have been quite discrete in my kitchen lately. Don't you worry! They are still around. We even have got a baby dinosaur. It's a T-Rex, but he doesn't bite. He is scared by humans because he is a baby. Dixit my 4 years-old.

Few days ago, while I had to work from home while looking after my sick baby, my big boy commissioned me to take care of his baby dinosaur, who was also sick. It's was really cute to see my big boy talking and comforting to 'his baby dinosaur' as a parent would do. 'Don't worry my baby. Ma maman will look after you while I'm away at daycare. Don't cry. I'll come back later.'
And to me: 'Maman, please put him under the blanket and don't leave him alone. He is little and unwell. Don't be scared. He won't bite.'

What a relief! As long as he won't bite, I'll take care of him... That day promised to be quite busy, perfect for a 7-hours lamb leg confit!


I've already told you about the recipe I'm sharing today. You, busy working mums, busy mums at home, busy daddies, you greedy meat-lovers, working girls, business man, well you who is looking for a stunning dinner to full-fill your family or your hungry man, to impress your friends... with a minimum effort for a maximum effect, there you go: the 7-hours lamb leg confit or lamb leg a la cuillere.


I hear you thinking: "7-hours?! She's completely out of her mind!!!... I'm too busy, can't afford the time..." COME BACK! - I said: come back! Pleeeaaase! You won't regret it.
The roast will cook for seven hours, but it will take at most 15 minutes off your time. Trust me! You can either go out for shopping or work (using the stop cooking function of your oven), spend your day playing/looking after the kids, gardening, doing cross-words or maybe doing some Lebanese bread to compliment your lamb leg confit... while the lamb leg is slowly cooking for you...
Just try it, you'll love it!


With this lamb confit recipe, you'll get a moist and tender meat falling off the bone with a beautiful olive oil and lime jus to baste the meat and the veggies. The meat will be so moist and tender that you can spoon it! Hence the French name 'a la cuillere'. De-Light-Ful!


Saturday, 24 August 2013

Revisited Vietnamese nems - A healthy trick for kids

This post could have been titled 'How to make your kids love cabbage', but instead I preferred the reference to nems, the traditional Vietnamese rolls.
Traditionally, nems are fried rice paper rolls stuffed with pork, prawn or beef. They are quite easy to make and flavoursome. But they are not the healthiest Vietnamese food because they are fried.

While I was shopping at the local veggie store, looking for seasonal veggies other then carrots, parsnips and pumpkin, I saw cabbage. This is such a controversial veggie for children. I personally love red cabbage; it's a quite regular vegetable at home. I was after something less usual. White cabbage... we all like it raw in salad, but cooked it is quite controversial for my No.1. Then I saw savoy cabbage - they look so beautiful - and as I couldn't remember when was my last attempt with this kind of cabbage. I thus decided to go for this beautiful savoy cabbage. Then started the thinking... how could I sell this to my No.1.


Spark of genius! what about making nems? but instead of using rice paper, I'd use savoy cabbage leaves. And instead of frying them I'd steam them. I was not quite sure about the preparation and cooking process, but the idea was worth a try!

My revisited nems, served with sweet soy sauce, turned out gorgeous and so tasty! No.1 even asked for a second serve! Mission accomplished? Oh yes!

What's your trick to make your children eat cabbage? 

Friday, 23 August 2013

Hazelnut moon crescents / Croissants de Lune Sablés

With this unstable weather, I suggest to step back into your kitchen to make these lovely, crumbly hazelnut sablés. These hazelnut moon crescent are the home-made version of a famous French biscuit brand (Les croissants de Lune de Bahlsen).


I have my very own way to eat them since I was a child: one moon segment at a time! I love them on their own or a cup of tea, but they would probably be fantastic served with a cup of coffee (If I'd like coffee!).


As per the original recipe, I shape them as little crescents. The dough is so easy to work that you can let your kids express their own creativity. My 4 years-old made caterpillar and mushrooms, unfortunately they've been eaten before I could make any pictures, so there you can see them before baking. Dinosaurs are back!


Sunday, 18 August 2013

Home-made praline / praliné

I'm preparing some special hazelnut sablé biscuits for my son's daycare snacks. Those French biscuits needs some flavoursome praliné paste, which probably can't be bought from NZ supermarkets or groceries. The good news is that it is super easy to make your own praline and once you have tasted this delicious topping or paste, I bet you'll become addict straight away!


The recipe I'm sharing today comes from a world-renowned French pastry chef: Philippe Conticini, so it is a high standard recipe, but you'll be stroke how easy it is. You just need a good food processor and a little bit of patience.

But what's praline or praliné? It's a combination of hazelnuts and/or almonds, but could also contain pistachio or cashew. The nuts are roasted, then cooked in a slightly dark toffee and pulverised finely. After few seconds in the mill or blender, you'll obtain a powder - the praline -, if you keep grounding, then you'll obtain a paste - the praliné -.


The praline is a gourmet topping for ice-cream or custard, crumble and apple pies, and I bet it would be lovely on the top of a pavlova... I'm just saying...
The praliné paste is delicious spread on toasts, combined in crème chantilly for choux filling, or combined in cake, brioches, cookies and biscuits.


Friday, 16 August 2013

Lebanese flat-bread with Zaatar

I usually just can't follow a recipe. I always feel the need for putting a personal twist on to it. But there is one source I would always trust when it comes to making bread.

This Lebanese flat-bread recipe comes from a blog called Papilles & Pupilles, which means 'buds and pupils', because you also eat food with your eyes, one of my favourite French cooking blog.
Anne from Papilles & Pupilles is a famous French blogger who is particularly talented for making bread. I am very happy to share this recipe with you beyond the French borders.


These Lebanese breads are very easy to make and deliciously soft and the Zaatar* brings beautiful middle-eastern flavours. The Zaatar is a traditional Lebanese mix of  spices and herbs, which includes oregano, thyme, sumac and sesame. If you can't find it in the shops, it easy to make yourself. The porportions vary from one region to another one in Lebanon, so just make it to suit your taste.

They are perfect to dip into freshly made hummus or to compliment lamb or any other middle-eastern flavoured meat on the barbecue.


My 4 years-old helped me making these, so when I say they are easy, I mean easy. A nice mum and son bonding time. For few minutes, dinosaurs were left out of the kitchen, for the greatest joy of my sensible ears.


Wednesday, 14 August 2013

My gourmet mango crumble

I won't hold the suspense any longer. Here is the recipe of my gourmet mango crumble!
For this absolute pleasure, you'll need butter cookies or shortbread cookies (see recipe here), vanilla ice-cream (see recipe here), salted caramel sauce (see recipe below) and of course fresh mangoes!
If you don't have the time to make all these elements yourself, you can easily use shortened biscuits, ice-cream and caramel sauce from the supermarket, but let's be frank: it will be much nicer home-made, and you can prepare all the elements in advance so that you just need to prepare the roasted mangoes before you serve. Don't be afraid by these elements; they are all super-easy to make!


Mango crumble (6 servings)

Ingredients

- 2 fresh mangoes, diced into very small pieces
- 1 knob of natural butter
- 1 tsp raw sugar
- 6 butter cookies or shortbread cookies - see recipe here
- 1 or 2 scoops of vanilla ice-cream per serving - see recipe here
- a generous dash of salted caramel sauce - see recipe at the end of this post